1. Launch Eclipse by double clicking on 'eclipse.exe'
2. You'll be prompted with a dialog box, just click 'Ok'
3. You'll be presented with this window:
 Just click on the 'Workbench' icon. Highlighted in red. Medyo baka iba ang hitsura sa machine nyo kasi I'm using Ubuntu (a linux distro) pero same lang yan.
4. Lalabas na yung main window talaga. Click on 'File' -> 'New' -> 'Other'. Kagaya nito:
 5. Scroll down to 'Web'.
6. Expand the group and select 'Dynamic Web Project'.
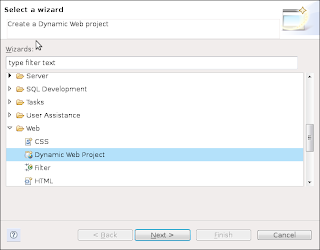 7. Click 'Next'
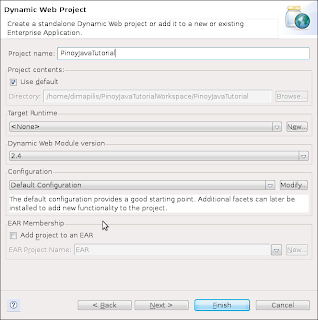
8. Put in 'PinoyJavaTutorial' sa Project name' and click 'Finish'. Kagaya nito:
 9. You'd be ask if you want to open the 'Java EE Perspective', just click 'Yes'
Congratulations! We now have a J2EE project at our Eclipse workspace! :)
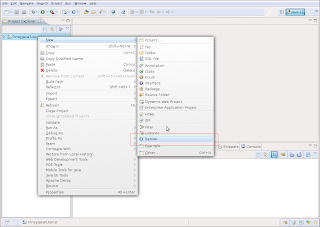
10. Right click on the newly created project and select 'New' -> 'Servlet' as shown in the red box below:
 11. You'll be presented with a 'Create Servlet' window. Put in 'HelloWorldServlet' as shown below:
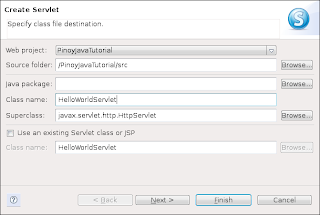 12. Click 'Finish'
13. You'll be presented with the predefined 'HelloWorldServlet.java'
14. Unlike sa usual Java app, yung JVM (Java Virtual Machine) ay hinahanap yung 'main()' na method. Sa servlets, pupunta sya kagad sa 'doGet' or 'doPost' na methods since yung 'main()' method natin ay nasa tomcat na. Bale ganto para malinaw:
usual Java application: JVM -> main method
by servlets: JVM -> tomcat -> doGet or doPost method
Depende kung pano natin sya tinawag, kung 'doGet' or 'doPost' ang gagamitin. In our example, sa 'doGet' sya pupunta kasi ang 'doGet' ang default. Sa mga succeeding lessons na yung difference ng Post and Get. Easy-easy lang muna tayo.
15. Put in the following codes under 'doGet':
PrintWriter pw = response.getWriter();
pw.print("Hello World from Servlet!");
Magkakaroon ng underline na kulay pula yan since PrintWriter is unknown. We need to import pa kasi yung PrintWriter na class. However, since we are using Eclipse, just press 'ctrl + shift + O' para mag-automatically import na sya. Magiging ganto na ang hitsura ng 'doGet' method natin:
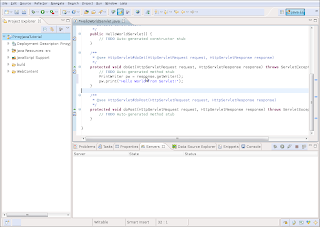 16. Now, we need to configure our server from Eclipse. Click on 'File' -> 'New' -> 'Other'
17. Expand 'Server' then select 'Server'. Kagaya nito:
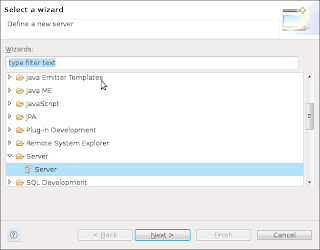 18. Click 'Next'
19. Expand nyo yung 'Apache' then select 'Tomcat v6.0 Server':
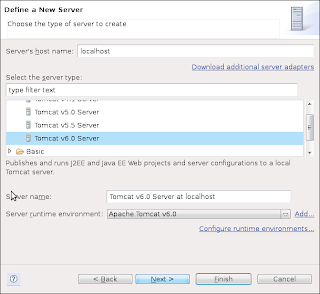 20. Click 'Next'
21. Sa next window, browse nyo lang kung san nyo nilagay yung extracted na 'Tomcat'. Yung value nito ay same ng value na nilagay nyo sa 'CATALINA_HOME' nung nag ko-configure tayo before.
22. Click 'Finish'
23. Now, dun sa Project natin, right click, 'Run As' -> 'Run on Server'. Like this:
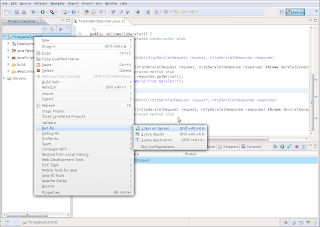 If may lumabas na window kagaya nito:
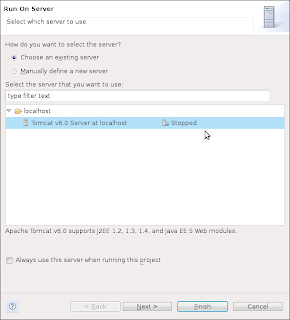 Just click 'Finish'
24. Mag e-error yan since wala pa tayong default na page. Pero try putting in http://localhost:8080/PinoyJavaTutorial/HelloWorldServlet and you'll see this page:
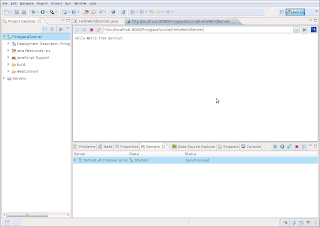 You can even open your browsers and go to http://localhost:8080/PinoyJavaTutorial/HelloWorldServlet and you'll be greeted by our Hello World Servlet message.
Congratulations! You have now created your first Servlet! I'll explain on my next blog entry, which should be coming the week after next week, on how everything works. :)
No comments:
Post a Comment